Showing posts with label sewing. Show all posts

Saturday, November 12, 2011

Tutorial for toy guitar strap

Gideon has this guitar that he loves. Dave and I were saying that he needs a strap for it so he can be more like Daddy. So, while Dave took Gideon on an errand, I sat down to make one! Here's what it looks like- very adjustable and we can take it off for when we aren't able to supervise him with it (he really likes wrapping things around his neck.


Maybe this will help him learn how to hold the guitar correctly.


So, I started out trying to put a shoelace through the little holes but it wouldn't fit. So, I found some ribbon and made a couple loops.


I just hand sewed them on and turned so the sewn part is inside the hole.

Then, I chose my fabric (from an old pair of jeans), hemmed the short sides and then made a tube with the long sides.Turn it right side out.
I added some batting to it as well so it'd be cushy on his shoulder and neck.
I stuck the batting and the shoelace inside the tube and sewed up the ends. Then did a little basic quilting so the batting wouldn't move around too much.


Tada! A guitar strap! Just tie the shoelace to the loops of ribbon- very adjustable! As with everything that goes around the neck, make sure to always watch your baby so they don't strangle themselves.

Friday, November 11, 2011

My machines

I have a Singer sewing machine from the 1970s and a Pfaff Hobbylock 794. I love them both. The sewing machine I purchased when we moved to Lewiston for $100. It came with the table and accessories. It is missing the front cover but it doesn't affect the performance. I found one at a thrift store recently and I would totally have bought it for parts if we had the room.

The serger was my grandma's and I inherited it when she died.


Aren't they beautiful?

Thursday, November 10, 2011

Tutorial to make a sock doll (from a knee sock)

I made another sock doll yesterday so I could post a tutorial. I'll be sending this one to my niece (you are welcome, Nicole). So, here's how to make it!

I used a serger to sew up the seams but a regular sewing machine will work just fine.

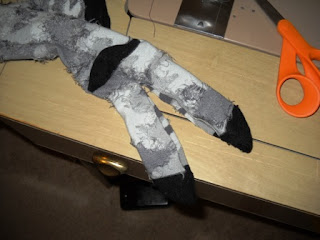
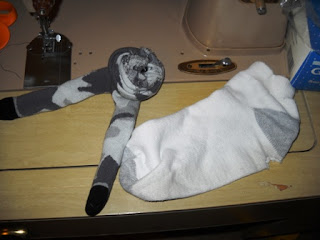
Take a knee sock and imagine the heel as the butt of the doll. Turn the sock inside out and cut from the toe to about an inch from the heel. Sew up either side (I rounded the toes a little to look more like feet.)

Then, choose how tall you would like the doll and cut off the top of the sock. Cut about an inch from the band of the sock and cut the middle part in half (for the arms).

Turn it right side out and then stuff the legs of your doll. I rolled up an old athletic type sock and put it in the butt so the doll will sit up on it's own and has a little more weight to it. I also cut up another sock and added it for the extra weight but was a little softer when mixed with the other stuffing. Go ahead and stuff the arms and sew those as well.


Once it is all stuffed, sew up the top.
 The top part you cut off will become the hat. Sew that up and turn it right side out. Place it on the top of the head and hand stitch with a coordinating thread. Separate the head from the body by wrapping thread around and sewing through the neck. (This always makes me feel a little weird and violent.)

Sewing on the arms is a little harder and has to be done by hand. I fold over the sewn part and then sew flat to the side (so the very end is hidden). When one is sewn on, I stab the needle straight through the body to the other side to sew the second arm.

Once the arms are done, you can sew eyes and a mouth or just leave them without. And, you are finished! This could be done with smaller socks, you would just need two instead of one.
  Just remember, making these is not a science. If something doesn't look quite right, tweak it until it does. Have fun!

Wednesday, November 9, 2011

I made a sock doll for Gideon!

I've been wanting to make a doll for Gideon. He doesn't have any stuffed animals out because he pulls the fur or fuzz off of them to eat.  But, I figured a sock doll would be harder for him to pull threads from.

I looked at a few tutorials online and then just started cutting. I think it turned out pretty cute. I used a regular pair of athletic socks to stuff the middle so it's a little heavier and can sit on its own. The rest is just regular stuffing.


The first thing he did when I gave it to him was give it a hug!


Then he just carried it around by its head. He hasn't played with it much yet but at least he has something soft and cuddly if he wants it!

Wednesday, November 2, 2011

Sweater redo (with bonus scarf!)


I found this sweater at a thrift store for $3.75. I did not love the HUGE amount of sweater in the front (I guess you are supposed to wrap it around you like a scarf?) I don't know, but it was not flattering on me. I almost put it back on the rack until I saw the fiber content- cashmere and cotton! If it had been polyester I would have put it back immediately, but I prefer natural fibers so this was an awesome deal to me! I knew I'd be able to make it work for me.
So, I washed it, tried it on, marked where I would like the front to end and then cut off the excess. I serged the edges and TADA! A new sweater! The thread I used did not match exactly. I had one cone of purple that almost matched so I used that for the thread you would see the most of on the front. I used a slightly lighter purple and two cones of navy for the rest. I have tons of serger thread I inherited from my grandma along with the serger and I'm really trying to not buy more unless it's a really great sale. (Same goes for all my crafting supplies.)


Here's the finished sweater. As you can tell, it was a foggy, drizzly day!


And, with those big chunks I took off the ends, I made a ruffled scarf! It's the first time I've used the serger to purposely make the edges ruffled and I love how it turned out. The scarf has a wrong side and a right side since I joined the two pieces with the serger before serging the sides. 


Tuesday, November 1, 2011

A sweater blanket- upcycled of course!


I started this blanket months ago and set it aside because I was getting annoyed with it. It's not easy working with a bunch of different weights of knitted sweaters!

I had a pile of sweaters and scarves that either didn't fit or I didn't like wearing any more. All were pretty worn so I decided to upcycle them instead of donating. Having a serger definitely helped with this project but it could be done with a zig zag stitch on a sewing machine.

First, I cut the arms off the sweaters (serging the edges as I cut so I didn't end up with a bunch of unraveling edges!) Then, I got them into the largest usable pieces I could. Once I knew how much I had to work with, I made a plan for the size and placement of the squares. Then, I did more cutting and serging.

When I started to put the blanket together, I had some major issues with my sewing machine catching on the bulkier knit items. It was frustrating and made some of the squares a little wonky. (That is a technical sewing term.)

I backed the blanket with an old sheet. This, also not easy! It kept bunching and since the knitted materials stretched and the sheet didn't, some were no longer square. I finally safety pinned each square to the sheet and then adjusted until it was as straight as I could get it. I was going to do some quilting on it, but the same problem arose with the machine catching on the knit. I finally gave up and put the blanket in a in progress bin for about 8 months.

On Saturday, I was trying to decide what would be my next project when I remembered the in progress bin at the bottom of my craft closet. We just rearranged the room so I can actually get to it. So, I dug out the blanket. I decided to just use yarn ties instead of trying to sew any more. I used light yarn on the dark squares and dark yarn on the light squares.

But, I didn't know how to edge it. There was no room to do a bias tape binding without making the outside squares smaller than the others. So, I just serged the whole thing! Kind of the cheater's way out, but oh well! I'm all for easy!

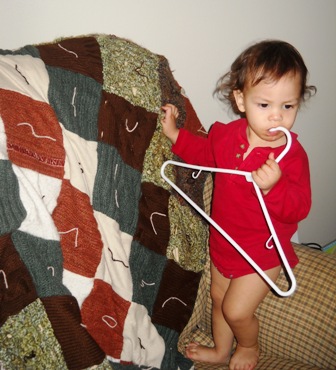
 The finished product is perfect for a lap blanket or a small child blanket... just not my small child. He likes to try to eat the fuzz off sweaters and would definitely be trying to pull the yarn out. 

 He wanted to be in the pictures. He is wearing a diaper in that picture, the onesie just covers it up! He is pretty much always without pants at home.

Friday, October 28, 2011

Altering a t-shirt

 I have a couple of regular old t-shirts that I don't really like. The neck is too high and makes me feel claustrophobic. I just prefer V-neck so I decided to alter them with my good old serger.

 I cut the V-neck using a shirt I like as a guide.


Then, I just serged it.


I decided the sleeves and bottom looked kind of funny to not match the neckline, so I serged all around them as well.


I think I like them better. They are looser and just seem to fit better. I'm not sure if the bare serging makes them look like pajamas though... oh well, I'm one of those people who don't mind wearing pajamas out in public!

Wednesday, October 26, 2011

Sewing while Gideon is awake

 Sewing while Gideon is awake is a little more difficult but manageable. He definitely enjoys it, even if I don't!


He likes to take the thread off my machine. After he played for awhile, I put it away.


 So, he reached inside to grab the thread and try to eat it.

Successful tasting of the thread. Thankfully, I still managed to start and finish a project!

 I made a needle and hook roll yesterday. Even with my little helper it took less than an hour.


 I just used one large piece of cotton fabric, serged the edges, sewed on three pieces of felt and then put holes in the felt for the needles and hooks to go through. I used scissors at first but then realized my seam ripper worked faster and was more accurate.


 Then, I just sewed a matching strip of fabric for the tie. Easy peasy! It works and looks better than the plastic grocery sack where I was keeping my needles.

Tuesday, October 18, 2011

I've been sewing for Gideon!


I've made him a sweatshirt, two shirts, two pairs of pants and a pair of sweatpants in the past three days.

I used the MADE 90 minute shirt tutorial and her pants tutorial as well.

I also finished a beanie for him this week. It's getting colder here and he will need a hat for sure. It's not the best picture of the hat but I love the little curl escaping from the side!


I did find some great deals on shirts and a couple pants for him at the thrift store. He really was in need of some warmer clothes! I will probably make him one or two more pairs of pants just because they are so easy!

Wednesday, January 6, 2010

Unpaper towels!

I finally made unpaper towels! I inherited a serger from my grandma at the end of October. Along with lots of different types of material. I found a large piece of white cotton and a very old flour sack that I cut up for the unpaper towels.

I have made a lot of cloth wipes for baby with the serger already but was just using the white thread that was already on the machine. If you've ever seen the threading of a serger, it is pretty intimidating! I finally got up the courage to do so, with a tip from an expert sergist (not really a word, I'm sure) to tie the new thread onto the old thread and run the machine until it gets to the needle and then finish threading by hand. It only took me about 20 minutes to finally get it all rethreaded that way. I'm sure it would have taken three times as long had I tried to do it all from the beginning!


Anyway, these are my towels, all stacked neatly next to my toaster and cookbooks. The sink is to the left. As you can see, the paper towel holder hangs above them. It is now empty because we just ran out of paper towels. I made these things just in time! They kind of double as napkins too since we usually ended up using paper towels for napkins. I plan on making some nicer napkins for us at some point but for now, these things work really well!


I ended up with about 20 I think. They are probably 10" by 10" and so very absorbent! I was pretty surprised at how well they work at picking up little spills and things. Now, my next task is to get a little basket to throw the dirty ones in.

Friday, May 22, 2009

Following up on a few things...

I was looking back through old posts and realized I haven't updated on several things!

So, on the creamer. Turns out that getting so many cans of condensed milk and all that is not really that eco friendly. And, the husband didn't love it. So, I realized that Darigold makes flavored half and half. We've started buying that instead. It's in a carton so not as bad as the plastic, it tastes good and it's made with real milk!

On the lemonade. Months later and still going strong. It's easy peasy to make and adding the strawberries is amazing! I bought a big bag at Costco. Whenever I decide to make strawberry lemonade, I take a few out and let them sit in a dish for about 15 minutes. They are then very easy to smash with a fork. I throw them in a glass and pour in lemonade! I used the blender for awhile but it doesn't work so well and then I have to wash it.
I also got some popsicle forms and made some strawberry lemonade popsicles. They were pretty good though I thought they needed more sugar.

Crafting is going well. I've started making shirts for myself! I've made three in the past week from a pattern on www.sewmamasew.com/blog. It's so nice to be able to customize the fit, choose the material and it's very neat to know that you made what you are wearing, even if no one else does. I'll post pictures soon.

I think that's about it. My house is a disaster since I've been sewing so much and putting off cleaning. I've really got to tackle that this weekend.

Tuesday, April 14, 2009

More crafting...

So, the pi symbol and the little funny shaped toy are for a friend of mine who is having a little boy. She's a math nerd and I thought she'd enjoy the pi. And, it makes a perfect baby toy because it's easy to grab onto. The funny shaped toy is actually a rattle, it has a bell inside so it makes a little bit of noise.


These shoes were made to try out a pattern. I used some scrap fabric I had and the bottom of the shoes are cut from off-white stiff placemats that were stained during the first use. I think they turned out pretty good. For the next pair, I need to work on the elastic. The shoe on the right isn't as tight as the other one.

So, those are my latest crafting projects. The pi took me awhile because I set it down for a month or so. The rattle took me about an hour and the shoes about that too! Pretty quick little projects!

Friday, April 10, 2009

Some sewing projects!


I made a newborn gown and then a newborn sweatshirt!
I used the same pattern, just shortened it for the sweatshirt. I used some fabric I bought at Goodwill... it was about five yards for $2.50. So, these things cost almost nothing to make!
I think the newborn gown turned out really cute. So, I'm going to make a few more for some friends of mine who are pregnant.

Saturday, March 28, 2009

Look what I made!


It's a tag blanket for my new nephew. It's from ribbon I had on hand, the white fabric is the back of some that I found at a thrift store and the front is a fat square I found on clearance. After I started sewing I realized that I forgot to prewash the football fabric. I hope it doesn't shrink a bunch! I'll try washing it today and see what happens. I sure hope I don't have to rip it all out... Oh well, I'll remember next time. I really like how it turned out. I sure hope he likes it!