Showing posts with label reuse. Show all posts

Tuesday, November 1, 2011

A sweater blanket- upcycled of course!


I started this blanket months ago and set it aside because I was getting annoyed with it. It's not easy working with a bunch of different weights of knitted sweaters!

I had a pile of sweaters and scarves that either didn't fit or I didn't like wearing any more. All were pretty worn so I decided to upcycle them instead of donating. Having a serger definitely helped with this project but it could be done with a zig zag stitch on a sewing machine.

First, I cut the arms off the sweaters (serging the edges as I cut so I didn't end up with a bunch of unraveling edges!) Then, I got them into the largest usable pieces I could. Once I knew how much I had to work with, I made a plan for the size and placement of the squares. Then, I did more cutting and serging.

When I started to put the blanket together, I had some major issues with my sewing machine catching on the bulkier knit items. It was frustrating and made some of the squares a little wonky. (That is a technical sewing term.)

I backed the blanket with an old sheet. This, also not easy! It kept bunching and since the knitted materials stretched and the sheet didn't, some were no longer square. I finally safety pinned each square to the sheet and then adjusted until it was as straight as I could get it. I was going to do some quilting on it, but the same problem arose with the machine catching on the knit. I finally gave up and put the blanket in a in progress bin for about 8 months.

On Saturday, I was trying to decide what would be my next project when I remembered the in progress bin at the bottom of my craft closet. We just rearranged the room so I can actually get to it. So, I dug out the blanket. I decided to just use yarn ties instead of trying to sew any more. I used light yarn on the dark squares and dark yarn on the light squares.

But, I didn't know how to edge it. There was no room to do a bias tape binding without making the outside squares smaller than the others. So, I just serged the whole thing! Kind of the cheater's way out, but oh well! I'm all for easy!

 The finished product is perfect for a lap blanket or a small child blanket... just not my small child. He likes to try to eat the fuzz off sweaters and would definitely be trying to pull the yarn out. 
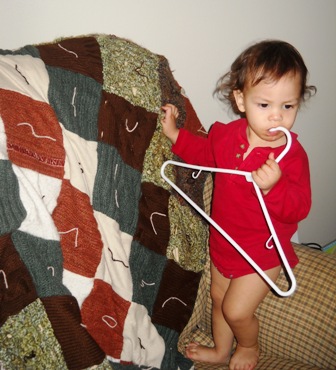
 He wanted to be in the pictures. He is wearing a diaper in that picture, the onesie just covers it up! He is pretty much always without pants at home.

Saturday, July 18, 2009

Yay for saving things from a landfill!

My grandma is moving soon and destashing some of her craft stuff. So, when I visited recently, she gave me a box of fabric. She had marked how many yards each piece was (will be helpful when deciding on a pattern!) All total, it's about 27 yards of fabric!


I should have taken up close pictures of it. There are some really fun patterns.

She also was getting rid of yarn, so I took a box of that. Some of the labels on the yarn are gone so I'm not sure what it is. And some of the labels are very vintage looking. Who knows how old it is! This will be added to my stash of yarn that doesn't have set projects... Someday!


She also had about 400 grams of wonderful 100% wool yarn that her daughter bought her years ago in New Zealand. She had a project half started but I frogged that so I can make wool diaper covers! The project started will be shorties (if the pattern changing I'm doing works out anyway!)
Such fun new additions to my craft stash!

Friday, July 17, 2009

I made some cloth napkins


I made four cloth napkins the other day out of some fabric I got from Goodwill. So, now we just need to remember to use these napkins instead of paper towels and it's another "green" move!

A little something about myself- I hate buying fabric new... it's so expensive. So, I got about three yards of this fabric along with about ten yards of other random fabrics for less than $6. Granted, you can't choose your patterns or amounts, but it's sure nice for little projects like this!

I also made an apron out of this material but was never able to get a good picture of it. And I made a shirt for a friend's little girl. I was doing some minor alterations to a shirt I'd made for myself when she was over and she asked if I could make her one. It was very simple to make. Just a rectangle of fabric hemmed and sewn into a tube. Then I put a piece of elastic around the top and put in sleeves.


It was difficult to get a good picture of her in it because she likes to run and hide from the camera. She really liked it and wanted to wear it right away. She also insisted to her mom that she be able to wear to church the next day.

Okay, so there's your second crafty post I promised!

Friday, June 19, 2009

More reusable bags

The other day, I ran to the grocery store with my resuable bag stuffed in my purses. I needed a few things for dinner- all of them from the produce department. So, I grabbed some green onions, cabbage, sweet onions and bell peppers. But, what was I going to put them in? I had no choice, just the plastic produce bags were there. I didn't put the onions in the plastic, but felt like the cabbage should go in one since it was so tender and I didn't want any dirt from the cart or bag getting on it. So, I ended up taking about three plastic bags home from the store, even though I had my reusable ones!


I had seen some reusable produce bags made out of mesh material with a drawstring online. I knew I could easily make them myself but I would just need to get material. But I would have to buy new material. I would rather reuse than buy new, so I slept on it. And, seriously, as weird as it sounds, in the middle of the night, I thought of some old mesh material that I had.


Two years ago, just before my wedding, I was shopping for veils. And I could not bring myself to pay hundreds of dollars for a piece of netting and a barrette. So, I made my own. I bought a yard of tulle and sewed it onto a barrette I already had. It was perfect and no one could tell I had only spent $2 on it!


Well, that veil has been hanging in my closet with my wedding dress. So, I fished it out, ripped out the stitches holding it onto the barrette (this also means I get that old barrette back) and cut it up!

Here are the finished projects. I used up some neon green thread I bought for a different project and some leftover bright orange cotton yarn from another project. The neon colors really catch the eye, don't they? I think that yard or so of material gave me four large bags and three skinnier, taller ones (the one the celery is in.)