Thursday, November 10, 2011

Tutorial to make a sock doll (from a knee sock)

I made another sock doll yesterday so I could post a tutorial. I'll be sending this one to my niece (you are welcome, Nicole). So, here's how to make it!

I used a serger to sew up the seams but a regular sewing machine will work just fine.

Take a knee sock and imagine the heel as the butt of the doll. Turn the sock inside out and cut from the toe to about an inch from the heel. Sew up either side (I rounded the toes a little to look more like feet.)

Then, choose how tall you would like the doll and cut off the top of the sock. Cut about an inch from the band of the sock and cut the middle part in half (for the arms).

Turn it right side out and then stuff the legs of your doll. I rolled up an old athletic type sock and put it in the butt so the doll will sit up on it's own and has a little more weight to it. I also cut up another sock and added it for the extra weight but was a little softer when mixed with the other stuffing. Go ahead and stuff the arms and sew those as well.


Once it is all stuffed, sew up the top.
 The top part you cut off will become the hat. Sew that up and turn it right side out. Place it on the top of the head and hand stitch with a coordinating thread. Separate the head from the body by wrapping thread around and sewing through the neck. (This always makes me feel a little weird and violent.)

Sewing on the arms is a little harder and has to be done by hand. I fold over the sewn part and then sew flat to the side (so the very end is hidden). When one is sewn on, I stab the needle straight through the body to the other side to sew the second arm.

Once the arms are done, you can sew eyes and a mouth or just leave them without. And, you are finished! This could be done with smaller socks, you would just need two instead of one.
  Just remember, making these is not a science. If something doesn't look quite right, tweak it until it does. Have fun!

Wednesday, November 9, 2011

I made a sock doll for Gideon!

I've been wanting to make a doll for Gideon. He doesn't have any stuffed animals out because he pulls the fur or fuzz off of them to eat.  But, I figured a sock doll would be harder for him to pull threads from.

I looked at a few tutorials online and then just started cutting. I think it turned out pretty cute. I used a regular pair of athletic socks to stuff the middle so it's a little heavier and can sit on its own. The rest is just regular stuffing.


The first thing he did when I gave it to him was give it a hug!


Then he just carried it around by its head. He hasn't played with it much yet but at least he has something soft and cuddly if he wants it!

Monday, November 7, 2011

Nursing a toddler- to wean or not to wean

Gideon still nurses. A lot. He's not showing any signs of stopping either. I planned on nursing for at least two years when I was pregnant and I still would like to, but, Gideon is becoming a very rude nurser.

After he bit me one night (he was asleep so it was not intentional, he's never been a biter) I was sore the next day so all these annoying things were driving me over the edge. 
Here are just a few of the things he tries to do:

Twiddle the other nipple. If I move his hand away, it immediately finds its way back. SO ANNOYING! He never did this when he was younger and I've never allowed it so I have no idea why he continues to try.

Playing with my face... which would be fine, except that he starts scratching and pinching and poking.

Standing up. Or turning his head to see behind him while still latched on.

Slapping my chest as he nurses (this started as patting gently but then he gets too excited and it starts to hurt!)

I still really don't want to wean him. Especially now that cold and flu season is here. And, it would devastate him. There would be so many tears. Not to mention it would be hard on me and Dave. Dave, of course, supports me in weaning or continuing.

So, I've made new nursing rules. No pinching, no poking, no scratching, no standing, no twiddling. If he tries any of these things, I move his hand and say no. If he tries it again, I immediately put him down. He's had a million mini tantrums in the past two days because of this but I think he'll get it soon.

If he doesn't get it, then we'll have to reconsider weaning, I guess.

Thursday, November 3, 2011

Learning some new crochet stitches

Through the amazing world of Pinterest, I've found some great new crochet stitches to try out. I'm working on a few different things using the new stitches I've learned.

No foundation crochet is awesome. I just used it to start a scarf and it really does make a nice tension free start!

The Puff stitch flower
 is really simple once you make one. I'm making a bunch of the blue ones and might end up with a blanket... or a scarf. Not sure yet! The purple one uses the puff stitch and will be a scarf.


The Star stitch makes a very light, soft scarf and I'm working on a blanket using the same stitch. 


 I feel like it's been forever since I learned a new stitch so learning all these has been fun. 

Wednesday, November 2, 2011

What's in my bag?


 I decided to actually do one of this link up things. I was running a little low on blog inspiration so this is perfect timing!

Here's my bag- it's big and doubles as a diaper bag.


And, the contents of my bag! I'll just list the things in there- I think you'll be able to tell what is what.

  • Package ready to send to a friend
  • Wallet (checkbook, cards, license, some change and coupons)
  • Water bottle
  • Container of goldfish crackers
  • Pile of trash- receipts, papers, wrappers (this will not be returning to the bag!)
  • Notebook with pen in the spiral
  • Spare keys for the truck and the car (Also, I found the second spare for the truck... which means if I had locked my purse and my everyday keys in there I would have been OUT OF LUCK! I totally thought Dave had that key!) 
  • Silver card case (contains some store cards and business cards I want to keep)
  • Tums
  • Chapstick
  • Floss
  • Baby spoon
  • Pen
  • Small plastic bag with safety pins, rubber bands and hair ties
  • Roll of nickels that I forgot when I went to the bank today
  • Gum
  • Small squeaky whale Gideon was given three weeks ago (also not returning to the purse!)
  • Change of clothes for baby
  • Small blanket
  • Four diapers
  • Ziploc of baby wipes
  • Ziploc with pads and tampons
Both the Dooney and Burke purse and the Coach wallet were gifts and I love them! My entire life I've had cheap purses so it's nice to have a couple that should last me for years.

Sweater redo (with bonus scarf!)


I found this sweater at a thrift store for $3.75. I did not love the HUGE amount of sweater in the front (I guess you are supposed to wrap it around you like a scarf?) I don't know, but it was not flattering on me. I almost put it back on the rack until I saw the fiber content- cashmere and cotton! If it had been polyester I would have put it back immediately, but I prefer natural fibers so this was an awesome deal to me! I knew I'd be able to make it work for me.
So, I washed it, tried it on, marked where I would like the front to end and then cut off the excess. I serged the edges and TADA! A new sweater! The thread I used did not match exactly. I had one cone of purple that almost matched so I used that for the thread you would see the most of on the front. I used a slightly lighter purple and two cones of navy for the rest. I have tons of serger thread I inherited from my grandma along with the serger and I'm really trying to not buy more unless it's a really great sale. (Same goes for all my crafting supplies.)


Here's the finished sweater. As you can tell, it was a foggy, drizzly day!


And, with those big chunks I took off the ends, I made a ruffled scarf! It's the first time I've used the serger to purposely make the edges ruffled and I love how it turned out. The scarf has a wrong side and a right side since I joined the two pieces with the serger before serging the sides. 


Tuesday, November 1, 2011

A sweater blanket- upcycled of course!


I started this blanket months ago and set it aside because I was getting annoyed with it. It's not easy working with a bunch of different weights of knitted sweaters!

I had a pile of sweaters and scarves that either didn't fit or I didn't like wearing any more. All were pretty worn so I decided to upcycle them instead of donating. Having a serger definitely helped with this project but it could be done with a zig zag stitch on a sewing machine.

First, I cut the arms off the sweaters (serging the edges as I cut so I didn't end up with a bunch of unraveling edges!) Then, I got them into the largest usable pieces I could. Once I knew how much I had to work with, I made a plan for the size and placement of the squares. Then, I did more cutting and serging.

When I started to put the blanket together, I had some major issues with my sewing machine catching on the bulkier knit items. It was frustrating and made some of the squares a little wonky. (That is a technical sewing term.)

I backed the blanket with an old sheet. This, also not easy! It kept bunching and since the knitted materials stretched and the sheet didn't, some were no longer square. I finally safety pinned each square to the sheet and then adjusted until it was as straight as I could get it. I was going to do some quilting on it, but the same problem arose with the machine catching on the knit. I finally gave up and put the blanket in a in progress bin for about 8 months.

On Saturday, I was trying to decide what would be my next project when I remembered the in progress bin at the bottom of my craft closet. We just rearranged the room so I can actually get to it. So, I dug out the blanket. I decided to just use yarn ties instead of trying to sew any more. I used light yarn on the dark squares and dark yarn on the light squares.

But, I didn't know how to edge it. There was no room to do a bias tape binding without making the outside squares smaller than the others. So, I just serged the whole thing! Kind of the cheater's way out, but oh well! I'm all for easy!

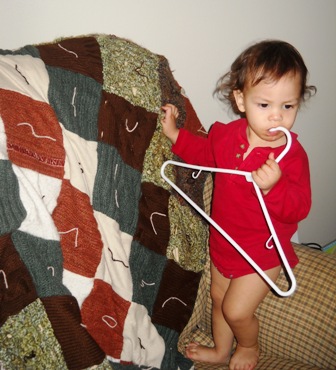
 The finished product is perfect for a lap blanket or a small child blanket... just not my small child. He likes to try to eat the fuzz off sweaters and would definitely be trying to pull the yarn out. 

 He wanted to be in the pictures. He is wearing a diaper in that picture, the onesie just covers it up! He is pretty much always without pants at home.