Showing posts with label eco-friendly. Show all posts

Tuesday, November 1, 2011

A sweater blanket- upcycled of course!


I started this blanket months ago and set it aside because I was getting annoyed with it. It's not easy working with a bunch of different weights of knitted sweaters!

I had a pile of sweaters and scarves that either didn't fit or I didn't like wearing any more. All were pretty worn so I decided to upcycle them instead of donating. Having a serger definitely helped with this project but it could be done with a zig zag stitch on a sewing machine.

First, I cut the arms off the sweaters (serging the edges as I cut so I didn't end up with a bunch of unraveling edges!) Then, I got them into the largest usable pieces I could. Once I knew how much I had to work with, I made a plan for the size and placement of the squares. Then, I did more cutting and serging.

When I started to put the blanket together, I had some major issues with my sewing machine catching on the bulkier knit items. It was frustrating and made some of the squares a little wonky. (That is a technical sewing term.)

I backed the blanket with an old sheet. This, also not easy! It kept bunching and since the knitted materials stretched and the sheet didn't, some were no longer square. I finally safety pinned each square to the sheet and then adjusted until it was as straight as I could get it. I was going to do some quilting on it, but the same problem arose with the machine catching on the knit. I finally gave up and put the blanket in a in progress bin for about 8 months.

On Saturday, I was trying to decide what would be my next project when I remembered the in progress bin at the bottom of my craft closet. We just rearranged the room so I can actually get to it. So, I dug out the blanket. I decided to just use yarn ties instead of trying to sew any more. I used light yarn on the dark squares and dark yarn on the light squares.

But, I didn't know how to edge it. There was no room to do a bias tape binding without making the outside squares smaller than the others. So, I just serged the whole thing! Kind of the cheater's way out, but oh well! I'm all for easy!

 The finished product is perfect for a lap blanket or a small child blanket... just not my small child. He likes to try to eat the fuzz off sweaters and would definitely be trying to pull the yarn out. 
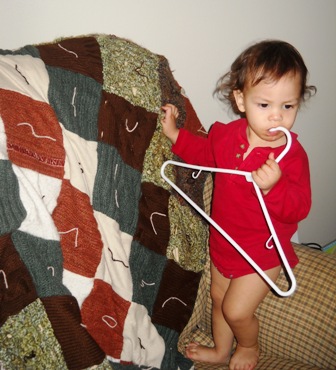
 He wanted to be in the pictures. He is wearing a diaper in that picture, the onesie just covers it up! He is pretty much always without pants at home.

Monday, October 31, 2011

How I thrift and some tips for you!


I have an ongoing list of things I need/ want that I watch for at thrift stores (I'm also not opposed to buying them on clearance). My list includes some kitchen things, the sizes Gideon needs in different types of clothes, yarn and other craft supplies, and many books. I am building a collection for Gideon of books I loved as a kid and from authors/ illustrators that I like. I'm also building a collection of chapter books for him.

I'm by no means a pro thrift shopper. I know there are people who thrift and then sell the treasures they find online and make money. I do have some tips for the basic for family thrift shopper though!

1. Keep an ongoing list of things you need or want. I used to keep a note on my phone until my list started getting too long and then I switched to a small notebook I keep in my purse.

2. Find out when or if the thrift store has half or or sale days. Goodwill does a certain color tag starting on Sundays for the week. A local thrift store I go to does certain types of items every few days- one day clothes are 25% off, another day books are 35% off, etc.

3. Don't expect to find everything (or even anything) each time. It's not a grocery store and there are no guarantees.

4. Go often and browse. You don't have to be there for hours. Just a lunch break or a few minutes while the baby is happy will work. Find out if the thrift store does a specific stocking day or time so you can go and get first look at things.

5. Don't buy things you don't need! Just because it's cheaper than new, if it's just going to collect dust in your house, it's no good to you!

I went thrifting on Friday and got an AWESOME deal! About 70 yards of lace trim for $1. It was just rolled up into a big ball so I wasn't sure if it was in one piece or not but I took a chance for a dollar. 

Tuesday, October 5, 2010

I made some diapers!


I used old t-shirts and towels that I washed in RLR to remove soap residue so they are absorbent.

The orange diaper is very absorbent and will be better for nighttime. I put three layers of towels in the center (sandwiched between four layers of soft old t-shirts.)

The gray and blue diaper was made from an old polo of Dave's that was starting to fall apart. I made a separate insert for that so it's less bulky and perfect for daytime use.

The diapers are fastened with a Snappi. I debated putting velcro on them but I think I'll wait for that until I can order the kind specifically made for diapers.

Gideon spends most of the day without a cover- I've discovered that he doesn't pee while he's asleep which makes me feel better while he naps on me. Keeping him coverless means he never sits in a pee soaked diaper and he gets plenty of air so he never gets diaper rash.

I will be making more diapers out of old clothes- hopefully they will last him through potty training!

Tuesday, September 28, 2010

Cloth diaper pictures!

We've been using cloth exclusively at home for almost 6 months. We love it and I thought I'd post some pictures of our little man wearing the different types.


Prefolds without a cover. Fastened with a Snappi.


Top: A Bummis cover over a prefold. Bottom: Thirsties fab fitted.


Top: Fitted snap diaper. Bottom: Flat, folded and fastened with a Snappi.


Huate Pockets diaper.

There are so many options out there for cloth diapers- this is a very small sample of what's available.

Wednesday, January 6, 2010

Unpaper towels!

I finally made unpaper towels! I inherited a serger from my grandma at the end of October. Along with lots of different types of material. I found a large piece of white cotton and a very old flour sack that I cut up for the unpaper towels.

I have made a lot of cloth wipes for baby with the serger already but was just using the white thread that was already on the machine. If you've ever seen the threading of a serger, it is pretty intimidating! I finally got up the courage to do so, with a tip from an expert sergist (not really a word, I'm sure) to tie the new thread onto the old thread and run the machine until it gets to the needle and then finish threading by hand. It only took me about 20 minutes to finally get it all rethreaded that way. I'm sure it would have taken three times as long had I tried to do it all from the beginning!


Anyway, these are my towels, all stacked neatly next to my toaster and cookbooks. The sink is to the left. As you can see, the paper towel holder hangs above them. It is now empty because we just ran out of paper towels. I made these things just in time! They kind of double as napkins too since we usually ended up using paper towels for napkins. I plan on making some nicer napkins for us at some point but for now, these things work really well!


I ended up with about 20 I think. They are probably 10" by 10" and so very absorbent! I was pretty surprised at how well they work at picking up little spills and things. Now, my next task is to get a little basket to throw the dirty ones in.

Monday, December 7, 2009

Finally! Another post... It's Christmas time!

So, my husband and I went looking at Christmas trees yesterday. It was about 10 degrees outside and blowing like crazy. SO COLD! The cheapest tree we could find was $35 and still too big for our living room. We decided to wait on it and ran to the store to grab a few things before heading home.


Well, I saw this tiny Italian pine tree there for $4. So, I decided to go with a living Christmas tree this year. Granted, we won't be able to fit many ornaments on it, but then, we don't have many! I'll just hang a string of lights around the sliding glass door behind it and we'll be all set with Christmas decorations. After Christmas I'll plant it in a bigger pot and keep it with the rest of my plants. Hopefully it will survive the year and we'll have a little bit bigger tree for next Christmas!

Sunday, September 27, 2009

Cloth diapers

The bane of a mother's existence, right? Wrong! I'm very excited about cloth diapering. It's better for the planet, better for my baby and it's SO cute! Here are a few purchases I've made for cloth diapering.

These are basic infant sized prefolds. You can use them with pins or with a thing called a Snappi (the blue thing in the picture below) that won't poke you or your baby!

The picture below is a wet bag you toss the dirty diapers into (no soaking in bleach anymore) that keeps in wetness. The bag can be tossed in the wash with the diapers. Also in the picture is a Thirsties fitted diaper. Super soft and cute!

In the bottom picture are two Muttaqin diapers. They are fitted and include inserts which can be customized for absorbency. The prefolds can be used later for large diapers to add more absorbency as well.

All these diapers need a cover so the pee doesn't get all over you or baby's clothes. We will have some plastic type (NOT like the Gerber kind you are thinking of) and wool. I'll do a whole other post on wool later when I can upload all the pictures of the adorable softness I've knitted for our baby.

There are LOTS of options out there for cloth diapering. For more detailed information, and lots of pictures, check out this blog. Ooh, and there was just a post about wool, so you don't have to wait for mine!

Friday, May 22, 2009

Let's talk honey


Recently, I stumbled across some information about honey being good for allergies. It was intriguing so I decided to read more. My husband has been suffering from allergies since we moved here and has just been using claritin and benadryl when it gets really bad. I've looked at some natural remedies but nothing seemed like it would actually work.


Raw local honey (made by bees where you live) contains pollen from the plants that cause your allergies. When you eat this honey, it builds up an immunity to those pollens. There are all sorts of studies and Web sites out there about it. It is important that the honey you get has not been pastuerized because that process kills and gets rid of all the good stuff in it like pollen and dust (appetizing huh?)


I found an ad in the paper by a guy that sells local honey and he's just a few blocks from our house, so I don't think it could get any more local unless we owned the hives! He does strain the honey but it is raw and does still contain pollen. I'd read a few things about unstrained honey but this stuff should work for the allergies. I might continue to look for unstrained honey locally. Maybe my supplier would bottle me up some special ones that haven't been strained.


Anyway, it was $6 for a quart, which I think is pretty good. So, the husband and I will be eating 2 to 3 teaspoons a day in the morning on toast or muffins. We hope that will help with our allergies this season!

Thursday, April 23, 2009

I did some greening this last weekend!

First of all, I bought enough reusable bags to take on a normal grocery shopping trip. Can I just say that I LOVE them? So much easier to carry than plastic ones.

And I also bought Dr. Bronner's and mixed up some all purpose cleaning solution. No more soft scrub in my house! Now I think I will need to start buying the giant bags of baking soda at Costco since my little box in the cupboard won't last long!

I'm also contemplating buying flour and sugar in bulk like that. Less packaging, less waste. And it stores for awhile. I just don't know where in my house I would store it. I don't have any pantry space...

In other news, I bought a spindle. Actually, I bought this:


On Etsy. I don't know why, but I have this fascination with homespun yarn and decided I might as well try to make it myself. Strangely enough, I feel like I've spun before... I wonder if my mom did it as a craft project for us children before. I'll have to ask her.

Well, it came in the mail this morning, dropped off at my work. Thankfully, I went home for lunch so I started spinning... and it's yarn! It doesn't look perfect, but that's the beauty of handspun yarn, isn't it? I'm just working with the alpaca fibers that came with the spindle for now. But, I've been researching places online to get wool fibers. I found a real store in Spokane that sells spindles and supplies so the next time the husband and I get up there I'm going to track it down.

Even though I only spun for 30 minutes or so, I'm itching to get it in my hands again! I think I'm addicted. I just really want to spin up the rest of the fiber so I can finish it and make something with it! What to make? I might dye it first (it will be my first time dyeing yarn too!) I don't have any idea of how much yarn the fiber will make. I'll post a picture of the process once I get something finished. Maybe a cup cozy or a scarf. Or some baby booties... who knows?

Sunday, April 12, 2009

Another step: Cut out the fake creamer!

So, I cut out our Coffee Mate creamer, effective this morning. I found the recipe by googling creamer recipes. There were lots of options but I chose one using sweetened condensed milk, regular milk and flavoring.

Here's the recipe:
One can sweetened condensed milk
1 1/2 cups regular milk
Any flavoring you want!

I added a capful of vanilla and a capful of almond (which, by the way, goes a LONG way... there was a lot of almond flavor from that small capful.)

I mixed it together in an old Ragu jar (16 ounces)- see I knew those saved jars would come in handy! We just have to remember to shake it well before pouring it into the coffee.

I have to say that it was good. I did add a little more sweetened vanilla syrup to my cup, but it was really good. And it was nice to know that my coffee actually had milk in it and not some milk derivative. Have you ever read the label on a Coffee Mate bottle? Yeah, not so much cream in there!

Next step- actually getting reusable grocery bags and remembering to use them!

Thursday, April 9, 2009

More eco change

I know, these eco changes are tiny... and done mostly out of a desire to save us money! But, a change is a change, right?

Anyway, when I was a kid my mom always bought blocks of cheese and grated it as needed. There were five of us so she would grate mounds of it for macaroni and cheese (we never had the boxed kind), tacos or pizza. I remember trying to sneak a handful because it was so good.

When I was on my own, I just bought the bags of preshedded cheese. It was just me and it was so much easier. I'm pretty sure I didn't even own a grater. This habit of buying bagged cheese continued after I got married. I bought two or three bags of it every week for tacos, lasagna, or toppings for pasta.

Well, then I started comparing prices. Good grief! I couldn't believe how much I was spending on grated cheese compared to buying it in a block. So, I switched to block cheese recently. Of course, the grater I had broke the first day I used it. So I sent the husband to Ross and he bought me a heavy duty stainless steel box grater with the no slip rubber on the bottom. I had put that thing to good use since I got it.

When I have some spare time in the kitchen now, I just grate half a block of cheese and we keep it in a plastic container. This way, it's readily available when I just need a little bit as a garnish or if I'm trying to make a quick dinner of tacos and the grater is dirty in the sink.

I didn't really think of this as being eco friendly- more saving us money. But, really, all those plastic bags the cheese came in with the ziploc top were being thrown away! And, I'm sure that there were extra preservatives and chemicals to keep the cheese from getting clumpy. I've even noticed that I've gone back to snitching some grated cheese. I never just snacked on the grated cheese out of the bag because it looked so dry and unappetizing.

So, even if it wasn't a concious eco change, I figure I'll rack it up as one anyway.

Next up, getting rid of our Coffee Mate creamer. I found several recipes using evaporated milk and flavor. That'll save us a ton too!

Wednesday, February 25, 2009

Knitting some dish clothes...

So, in the interest of "going green" I decided to make some dishclothes so I would have something for dishes when I run out of sponges (I used to buy in large packages so I have a few left).

I got some 100% cotton yarn and started knitting. I chose two different colors- one for kitchen clothes and one for washclothes to replace my loofah in the bathroom. I just knitted a large square for the bathroom ones.

But then decided to try something a little different for one of the kitchen ones. OK, to be honest, I didn't keep track of how many I cast on in the first place so it ended up too long. I realized it was going to be giant if I made it square, so I folded it in half and crocheted the edges together to create a square with a pocket for my hand. I also crocheted a little loop to hang it on a hook or over the faucet. I really like how they turned out!


Friday, January 30, 2009

To save or not to save? Eco friendly #2

I remember my great-grandma having drawers full of plastic containers- empty yogurt, cottage cheese, sour cream and butter tubs. She had so many glass canning jars that she used to keep her beads, polished rocks, oddly shaped sticks and other odds and ends for her craft projects in. She kept everything!

My grandma holds on to old tubs to store leftovers, sewing supplies and small things around her house.

My mom and my aunt both keep plastic containers and those plastic gallon tubs from ice cream (we ate a lot of ice cream as children). When we were little there were always plenty of plastic tubs to use while playing in the dirt, mud puddles, picking berries, gathering plants or for holding the random insect that we found outside. There were boxes of canning jars saved for the next season's canning, for drinking out of, for catching minnows in the creek, and they worked really well as bug holders too!

When I got my own place, I told myself that I did NOT want a drawer full of plastic tubs and lids that didn't have matches. I didn't want to search through it to store leftovers and go through the trouble of labeling them. So, I tossed all the plastic and glass containers for years.

But now, with the eco friendly ideas seeping into my brain, I've started saving. Slowly and carefully though, so as not to overwhelm my cupboards (or my husband with leftovers stored in sour cream, yogurt and cottage cheese tubs).

I've started saving glass. My husband loves Ragu spaghetti sauce (eventually I'll make my own, I just need to transition him into it). So, all those glass jars were being thrown away. In the past two weeks I've saved three of them! (We don't really eat that much spaghetti- I made two lasagnas last week, one to eat and one to freeze.)

Since they are glass, they work really well for leftovers- they freeze and they are dishwasher and microwave safe. And the label comes off so I can relabel it easily.

So, there's another step that saves some garbage and gives me more options for storing leftovers!

Tuesday, January 27, 2009

Eco change numero uno!

Okay, my first post about a change I've made that reduces my impact on the environment. And probably something that will make me healthier!

I don't have time for breakfast at home in the mornings. But, it's important that I eat it otherwise I will snack all day at my desk. So, I was buying those Quaker oatmeal packs and eating them soon after I came to work in the morning.

It's about $4 for each box of 10-12 packets I think. That's not too much money. And sometimes when Grocery Outlet had them, I'd buy several boxes and save a few dollars. I never did check the nutritional value on them. I mean, oatmeal is good for you, but I can't imagine how much sugar was in each of those packets! Plus, there was the box that went in the trash and each little packet that was thrown away, so definitely not eco friendly.

So, when my most recent box ran out, I decided to try to mix my own. Here's my recipe that I've hashed out so far. It might change a little as I continue to eat it. But, this morning's oatmeal tasted great!

Emilie's instant oatmeal
1/4 cup instant oats
1 Tbs each, milled flax seed, toasted wheat germ and brown sugar
Handful of raisins or chopped dried fruit (I'm going to try mangos next!)
Spices to taste (I add a sprinkle of cinnamon)

Mix thoroughly and seal in small container until you need it (for now I'm using a ziploc baggie that I will reuse until I can find a glass container it fits well in.) To make, heat about 1/2 cup water in microwave about 1 minute. Mix in oatmeal and stir. Let sit about 2 minutes until it's thickened. Enjoy!

It does taste different from the Quaker oatmeal, obviously. But, I kind of prefer less sweetness and I really like the raisins in it. Fruit and whole grains!

I'm going to go to Goodwill and see if I can find small glass containers to keep it in Five would be good because then I could make five portions for the week each weekend and just keep them in my desk. Then take home the containers as I use them, wash and reuse!

Some eco friendly thoughts

So, I've never been too bothered by the ecological impact I have on the world. It just wasn't something I thought about. And with the "green movement" that is in vogue now, the media had me believing that going green meant lots of money- you had to buy new and more expensive products.

Well, I've been lurking on an eco friendly Web site. I have learned SO MUCH! Apparently, going eco friendly is not expensive. In fact, if it's done right, it usually saves you money!

So, I've been thinking about ways I can reduce my impact on the environment and save money in the process!

We'll see where this leads me... and we'll see if I can get the husband to follow along!